Arrow Game Tap Away Arrow · hex arrow puzzle · limited moves
Arrow Game Tap Away Arrow Every tap follows the arrow — and every move counts.
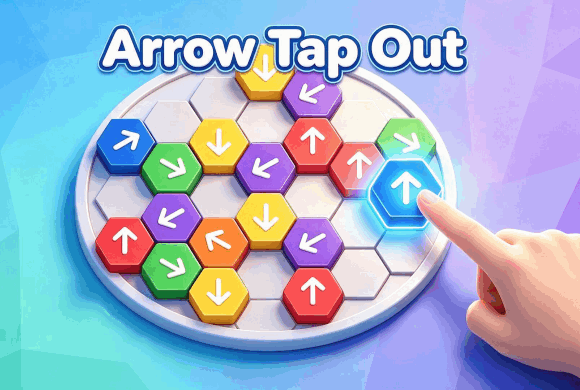
Colored hex tiles only travel in the direction on their arrow. Find open routes, clear blockers in the right order, and empty the board before the MOVES counter runs out.
Directional hex tilesEach arrow sets the only travel line
Blocked bounce-backObstructed taps return and cost a move
Arrow Game Tap Away Arrow is a directional block puzzle on a hexagonal layout. Tap a colored tile and it tries to travel along its printed arrow. An open route lets it leave and free space for the rest of the board.
If another tile sits in that lane, the piece hits the obstruction and returns to its start. That failed attempt still spends from the MOVES counter, so order and path-reading matter more than fast tapping.
Open space and gaps both count
Tiles can leave toward empty outer space or through holes inside the layout when their arrow lines up with that gap. Trace the full lane before you commit a move.
01Read each arrow
02Clear blockers first
03Spend moves carefully
Directional hex logic
How to play Arrow Game Tap Away Arrow
Tap an arrow tile. Click or tap a colored hex to start movement in the direction printed on it.
Confirm the route is open. If the path is clear, the tile travels away. If another block is in the way, it returns to its original spot.
Watch the MOVES counter. Each attempt lowers the remaining allowance, so avoid repeating the same blocked tap.
Clear the board in order. Remove the pieces that free other arrows, use internal gaps when they help, and empty every arrow tile before moves run out.
Read the puzzle · 01
How Does Arrow Game Tap Away Work?
A tile needs somewhere to go along its own arrow. Read the direction, trace the route, then check what your move will leave behind.
Every arrow has a fixed direction
The printed arrow sets the travel line, including the diagonal directions on this hex board. A tile cannot turn toward a convenient opening. If a gap sits beside the tile but outside that line, look for a different arrow that actually points toward it.
An arrow needs a clear path
Follow the lane until it reaches an exit: open space outside the platform or a hole within it. A gray platform hex is still part of the route; it is not a hole. If a colored arrow tile lies in the way before the exit, it is a blocker. Tapping the blocked tile sends it back and still spends a move.
Removing one arrow can open another path
Suppose A points toward B. If B can leave, remove B first and then trace A’s lane again. The platform under B may remain, but the arrow occupying it is gone. A can cross that space if the rest of its route is clear. Removing a colored arrow and drilling a hole in the platform are different changes.
Every successful move changes the board
After a tile leaves, inspect the arrows whose lanes passed through its old position. One of those routes may now be open, while another may still have a blocker farther along. A failed tap leaves the obstruction in place, so repeating it does not help.
Read the puzzle · 02
How to Read an Arrow Tap Out Board
Use this four-step scan when a board looks crowded. You only need to find one confirmed clear route to begin.
1. Check the outer edges
Look for exposed arrows pointing away from the cluster. They are useful candidates because there is less board ahead of them. An edge position alone is not enough: an inward-facing arrow may still point straight at another tile.
2. Follow the arrow’s direction
Trace a straight line from the arrowhead through the hexes in front of it. Continue to the outer edge or an internal hole. Do not stop at the first empty gray hex, and do not follow a neighboring row just because it looks clearer.
3. Find the blocker
If another colored tile interrupts the route, leave the first arrow alone. Read the blocking tile’s own direction and check its path. If that tile is also blocked, follow the next obstruction until you find a clear move. If you return to a tile you already checked, scan a different part of the board.
4. Move, then scan again
Tap the tile with the clear route. Return to the lane it was blocking and check it again before tapping the next arrow. Keep an eye on MOVES: a blocked attempt uses the same allowance you need for successful removals.
Look at the edge
Trace the lane
Find the blocker
Move & rescan
Read the puzzle · 03
Why Move Order Matters in Arrow Tap Out
An arrow can be a good move later and a wasted tap now. The difference is whether the pieces in front of it have already left.
Follow the blocking chain
A blocking chain is a sequence of dependencies: A needs B to leave, and B needs C to leave. If C has an open route, start there. Then recheck B, remove it when clear, and finally recheck A. The three-tile example below shows this on the Level 4 board.
Think about what opens next
When several arrows are clear, check which of their positions lies in another arrow’s lane. Removing a blocker gives you a useful next move to inspect. This does not mean every board has only one solution or that any clear edge tile must go first; the immediate goal is to avoid paying for a blocked attempt.
C leaves
Recheck B → move B
Recheck A → move A
Look closer · 04
Arrow Tap Out Puzzle Examples
Finding an open path
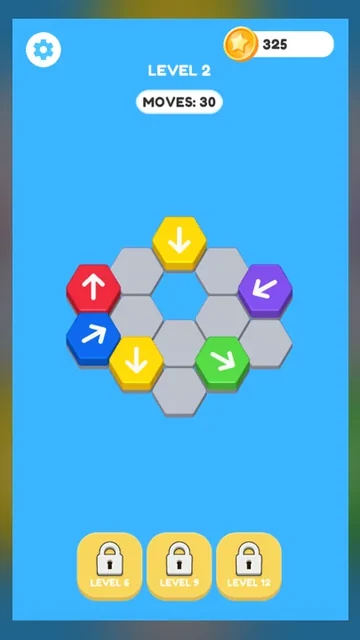
On this Level 2 board, the red arrow on the left points upward toward open outer space.
Read A’s upward arrow, rather than choosing it only because it sits on the edge.
Look directly above A. No colored tile interrupts that lane before the blue space outside the platform.
A has a clear exit. After it leaves, inspect any other arrow that points through the space it occupied.
On your next move: Use the edge to find candidates, then confirm the direction and exit before tapping.
Level 2 · A = red arrow. The solid line follows its route to the outer exit.
Why this arrow is blocked
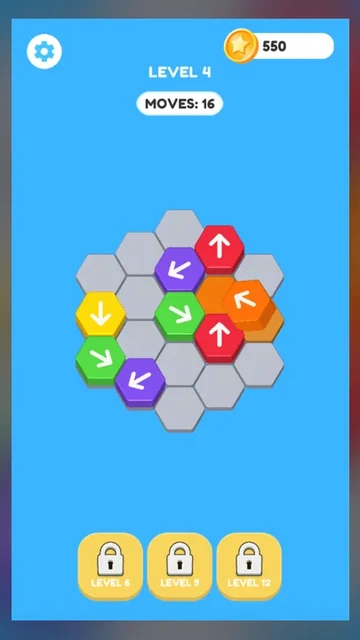
The upper purple arrow on the Level 4 board points down-left. The yellow arrow occupies that route.
Follow A diagonally down-left. B is in front of it, even though there is open blue space farther beyond the board.
Do not tap A yet: the outer exit does not cancel the blocker between A and that exit.
Now read B’s downward direction. The green tile below it needs checking next; B is not ready simply because you identified it as the blocker.
On your next move: A blocker is your next tile to inspect, not necessarily your next tile to tap.
Level 4 · A = purple arrow; B = yellow blocker. The dashed line marks the blocked route.
How one move opens another path
Look lower on the same Level 4 board. These three arrows form a chain: yellow A is blocked by green B, and green B points down-right toward purple C.
Start with C. Its down-left lane leads out of the cluster with no colored arrow in front of it.
Once C leaves, recheck B’s down-right lane through C’s former position. The purple blocker is gone, so B can leave along that route.
Then recheck A’s downward lane. Removing B clears the green blocker below A. The newly clear space is a route across the platform, not a drilled hole.
Move order · schematic
Before: A waits for B; B waits for C
Move C → B’s lane opens
Move B → A’s lane opens
Move A
On your next move: Work from the clear end of a blocking chain, and verify each newly opened lane as you go.
Level 4 · A = yellow; B = green; C = lower purple. This is the board before any of these three moves.
Recognizing an internal exit
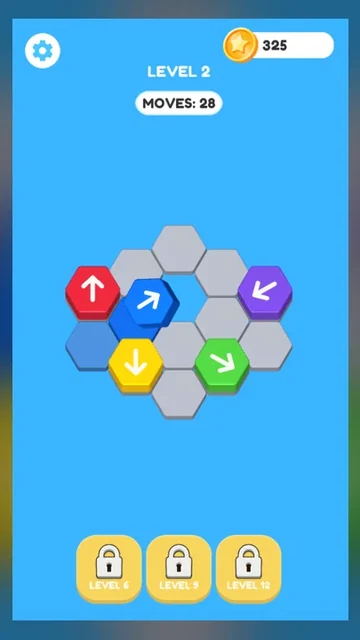
The Level 2 layout also contains a blue hole in the middle. The blue arrow shown here points up-right into that opening.
Compare the blue central opening with the gray hexes around it. The hole is missing platform, not just a platform hex without an arrow.
Read the blue arrow’s up-right direction. It lines up with the opening; a nearby gap in a different direction would not help.
Treat that hole as the exit for this route. You do not need to extend the route across the far side of the board as if the hole were another gray hex.
On your next move: Find the actual exit on the arrow’s line. An internal hole and an empty platform hex have different roles.
Level 2 · A = blue arrow; B = internal hole. The screenshot catches the arrow beside the opening.
Good to know
Hammer, TNT, and Drill
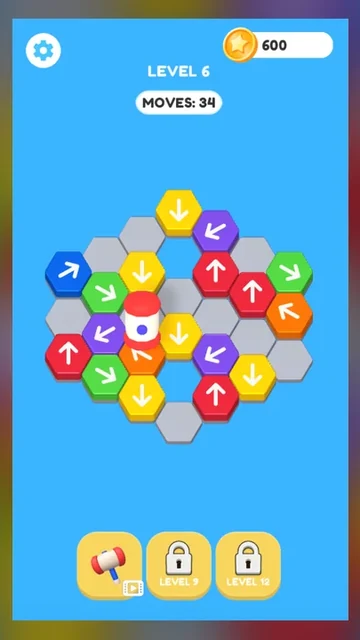
Hammer unlocks at Level 6 and destroys one selected arrow tile.
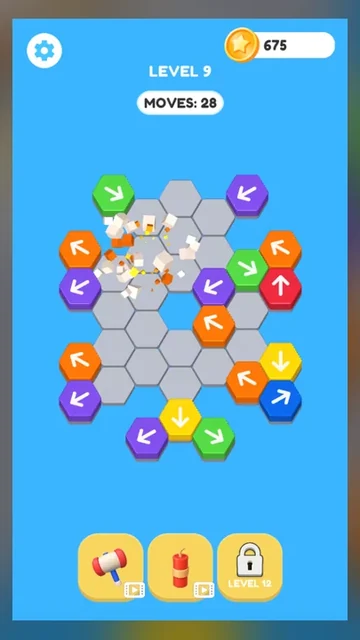
TNT unlocks at Level 9 and clears neighboring arrow tiles around where you place it.
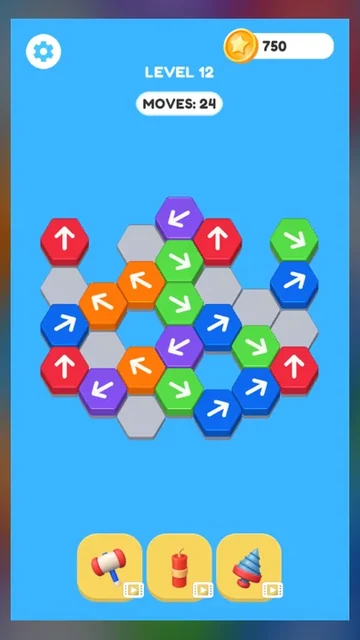
Drill unlocks at Level 12 and cuts a gray platform tile into an open gap.
Settings can toggle sound and music; completing levels awards coins for later play.
Hammer: remove one blocking arrow
At Level 6, Hammer lets you destroy a selected arrow tile. In this screenshot, the hammer is over the orange arrow near the lower-left part of the cluster.
First identify the specific arrow obstructing a route. Hammer is a single-tile tool, so choose the blocker you want to remove.
Select Hammer with the bottom-left control, then choose the arrow tile. A marks the orange target in this example; the tool removes that arrow rather than requiring it to slide out along its printed direction.
After the target disappears, trace any lane through its old position again. The gray platform remains, and another arrow farther along the route may still block the exit.
On your next move: Use Hammer to remove a specific obstruction, then check the full route you expected it to open.
Level 6 · A = selected arrow beneath the hammer; B = Hammer control. The image shows the tool in use, before the target has disappeared.
TNT: clear neighboring arrows
At Level 9, TNT introduces a way to clear neighboring arrow tiles around a placement. The screenshot catches a blast on the upper-left side of the board, with gray platform visible beneath the cleared area.
Look for neighboring blockers around the area you want to clear. Choosing a placement is a local decision: arrows elsewhere on the board remain separate problems.
Select TNT from the middle control and place it near the arrows you want to remove. A highlights the area affected in this example; the blast clears arrow tiles and exposes the platform underneath.
Let the blast finish, then inspect the remaining arrows facing through that area. Gray hexes are now unoccupied, but they are still platform, so continue tracing each lane to an actual exit.
On your next move: After a group clears, check which remaining lanes pass through it. Do not assume every nearby arrow is now free.
Level 9 · A = blast area; B = TNT control. Debris is still visible, so this is an action frame rather than a settled final board.
Drill: turn platform into an exit
At Level 12, Drill changes the platform itself. The blue opening marked A was a gray hex beneath the drill in the preceding action; here the tool has finished and the hole is visible.
Find a gray platform tile on the line of an arrow you want to release. A hole helps only when the arrow’s direction leads into it; being nearby is not enough.
Select Drill with the rightmost control and choose the platform tile. At A, the former gray hex is now blue open space. Drill creates an internal exit rather than simply removing a colored arrow.
Recheck the arrows around A. Follow each printed direction toward the new hole and look for any intervening blocker before tapping. Arrows that point away from it still need another route.
On your next move: Choose a drill position by the route it would open. The new hole does not turn nearby arrows toward it.
Level 12 · A = new hole after drilling; B = Drill control. The missing platform is different from an empty gray hex.
See the board
Inside Arrow Game Tap Away Arrow
Start movement on an arrow blockKeep reading the next clear arrowSend tiles into open spaceUse holes inside the layoutBlocked arrows bounce backHammer unlocks at Level 6Destroy one troublesome tileTNT unlocks at Level 9Blast a crowded clusterDrill unlocks at Level 12Cut through a platformOpen a new escape gap
Arrow Game Tap Away Arrow guide
Arrow Tap Out playing tips
Keep the next route in view and choose a helper according to what is stopping it.
Playing on desktop or mobile
Use click controls on desktop or tap controls on a phone. The same browser build fits either screen with the auto player layout.
Choose a helper for the obstruction
For one blocking arrow, consider Hammer. For neighboring arrow tiles, check the cluster around a TNT placement. For a route that needs a hole in the platform, consider Drill. Before using a helper, identify the arrow you expect it to free and trace that arrow’s direction.
Questions
Arrow Game Tap Away Arrow FAQ
What is the goal of Arrow Game Tap Away Arrow?
Clear the arrow blocks by moving them along their printed directions and finding a workable removal order before the MOVES counter runs out.
Why does a block return to its original position?
Another block sits in its arrow path. The tile hits that obstruction, returns, and you should remove the blocker first.
What does MOVES mean?
It shows how many attempts remain in the current level. Blocked taps still spend from that allowance.
Can an arrow move into an empty gap?
Yes. If its direction leads toward a valid open route or hole, the block can travel through that space.
What do Hammer, TNT, and Drill do?
Hammer unlocks at Level 6 and destroys one selected arrow tile. TNT unlocks at Level 9 and clears neighboring arrow tiles around where you place it. Drill unlocks at Level 12 and cuts a platform tile into an open gap.
Is Arrow Game Tap Away Arrow free to play?
Yes. You can play in the browser without creating an account or installing a separate game.
Can I play on mobile and desktop?
Yes. Arrow Game Tap Away Arrow runs in a modern browser with tap or click controls, and the player uses an auto layout for different screens.
Ready for a cleaner path?
Return to the board, trace the next open arrow, and spend each move on a route that actually improves the layout.